Resources / DSLR Camera Tips
Here are some tips for working in your digital camera's manual mode.
BEFORE YOU START FILMING
Before you can begin filming, there are four things that you need to check:
FILM SETTINGS
Use 1080 x19020 25fps, unless told otherwise. You can speed the frame rate up to 60fps if you want some slow motion, and give it a go (including editing) it to see how it looks.
FOCUS
Check the switch on the lens: if it is set to manual focus (MF) you can use the focus ring, and if it's in automatic focus (AF) the camera will do the focusing for you. Don't force the focus ring if it won't turn, as it will break. Instead, check that manual focus is turned on.
Make sure you focus your shots before you begin to shoot. Use the quick zoom button to zoom in and focus so the image is really sharp and then to zoom out to shoot.
There is a very cool simulator to test out depth of field online. It could help you visualize how to use the cameras, and is definitely worth checking out.
EXPOSURE SETTINGS
Lighting in your camera is controlled by three different settings: shutter speed, aperture and ISO.
The light meter will tell you have the exposure set correctly: if the little arrow is in the middle, then your shot should be well lit. Push the shutter down halfway to check your light meter. You can also look at the histogram which will show you the distribution of light in your shot.
Before you can begin filming, there are four things that you need to check:
- Film Settings
- Focus
- Exposure Settings
- White Balance
FILM SETTINGS
Use 1080 x19020 25fps, unless told otherwise. You can speed the frame rate up to 60fps if you want some slow motion, and give it a go (including editing) it to see how it looks.
FOCUS
Check the switch on the lens: if it is set to manual focus (MF) you can use the focus ring, and if it's in automatic focus (AF) the camera will do the focusing for you. Don't force the focus ring if it won't turn, as it will break. Instead, check that manual focus is turned on.
Make sure you focus your shots before you begin to shoot. Use the quick zoom button to zoom in and focus so the image is really sharp and then to zoom out to shoot.
There is a very cool simulator to test out depth of field online. It could help you visualize how to use the cameras, and is definitely worth checking out.
EXPOSURE SETTINGS
Lighting in your camera is controlled by three different settings: shutter speed, aperture and ISO.
The light meter will tell you have the exposure set correctly: if the little arrow is in the middle, then your shot should be well lit. Push the shutter down halfway to check your light meter. You can also look at the histogram which will show you the distribution of light in your shot.
|
Shutter Speed
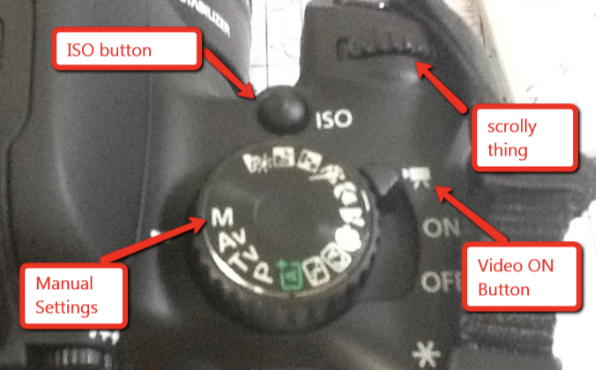
To get a film look, you want to have the shutter speed set at approximately twice the frame rate. If you're shooting 25 FPS, try and aim for 1/50. Change the shutter speed by using the scroll button on the front right of the camera. On the right is a picture of what it looks like on the 650D. A slow shutter speed will have motion blur and a fast shutter speed will freeze action (useful to know for photography as well). Video actually NEEDS some blur to smoothly transition from frame to frame, or you'll get a stuttering effect (this can be used to effect - the opening of Saving Private Ryan). Note: Obviously if you're wanting to slow your footage down, you'll want a higher shutter speed, otherwise you'll be able to see the blur when you slow it down. |
|
|
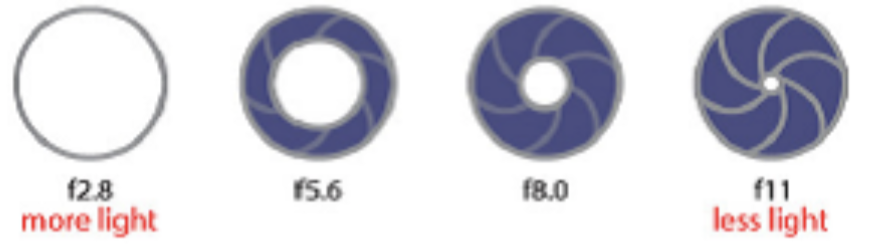
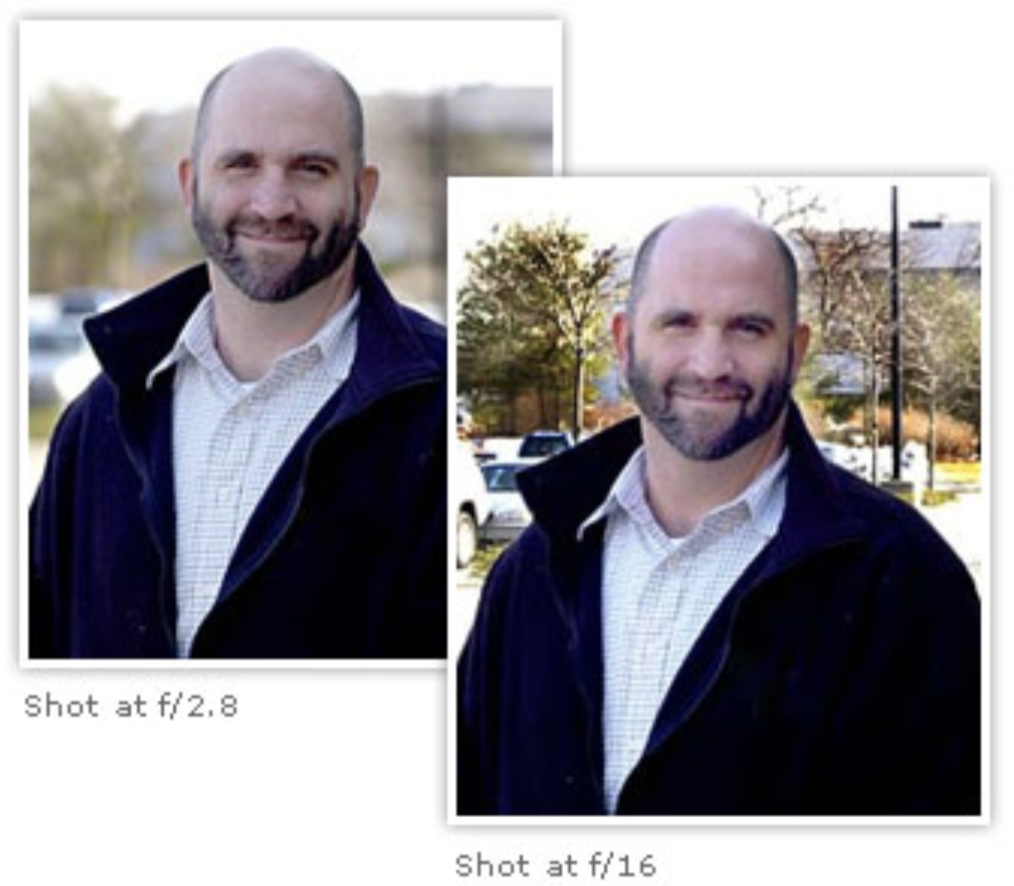
Aperture
If you want a shallow depth-of-field, you want a low number and if you want a longer depth of field, you want a higher number. Change your aperture by holding down the AV button to the top right of the screen and using the scolly thing on the front right of camera. You need to think about aperture for your exposure, but you also need to think about it for your depth of field (how in or out of focus the background of shot is). There's a pretty good explanation of how you might want to use this for storytelling here. The higher the F-stop number, the longer the depth of field, but the less light that is being let into the camera (smaller hole) and the lower the F-Stop number, the shallower the depth of field, but the more light that is being let into the camera (bigger hole). |
|
|
ISO
Try and keep this as low as possible. Change it by pressing the ISO button on the top right of the camera, then using the scrolly thing or on the 650D the touch screen. The higher the number is, the more sensitive your camera is to light, meaning you need LESS light to make things look properly exposed, BUT, the higher the ISO number is, the more digital 'noise' you will get. You will need to test your shots if you're filming in low light with a high ISO to make sure that you don't have too much noise. Think about it in advance! Here's an example of digital noise on a still shot - just imagine how unpretty it's going to look in your film! |

|
|
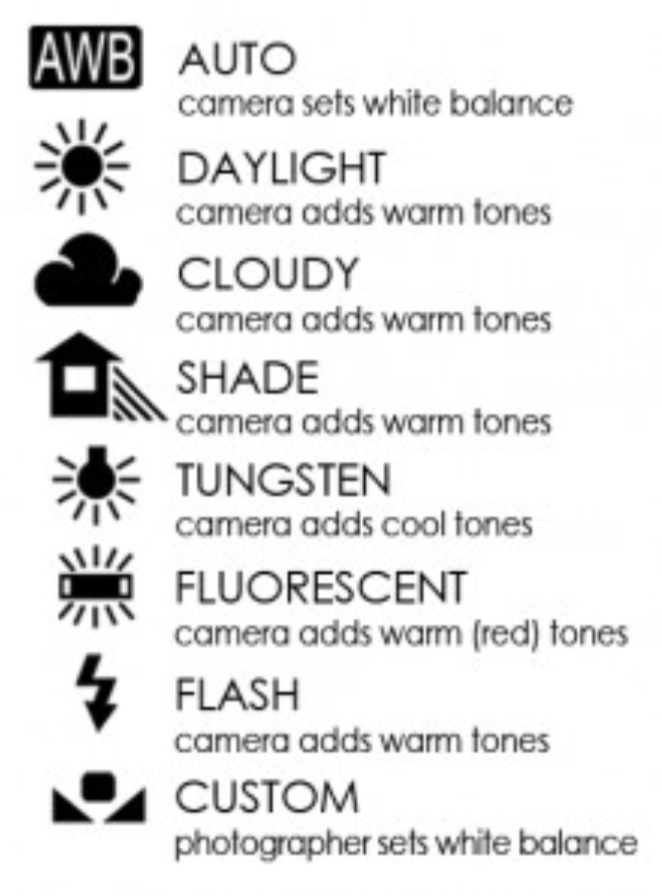
WHITE BALANCE
On the right are the possible white balance settings - if you are at all unsure, select AWB (auto) or one of the ready made settings. Once you are confident - set custom white balance. Never assume that the last person has set the camera on automatic white balance. Always check that it is reset before you use the camera, or you might end up with odd coloured footage. How to set custom white balance
|
|
A QUICK NOTE ABOUT PRIME LENSES
50MM
Things to know about them:
50MM
Things to know about them:
- They don't zoom.
- Sharper image.
- Better looking shallow depth of field (called bokeh - the aesthetic quality of the blur you get with the out of focus areas in an image).
- Let in more light, so in low-light conditions you won't have to boost the ISO (remember your ISO being too high will make your footage grainy).